Time: 25–45 minutes Difficulty: Easy–Moderate Best for: First-time DIYers
What you’ll learn: how to verify compatibility, open the laptop safely, swap the battery, calibrate it for best results, and recycle the old pack.
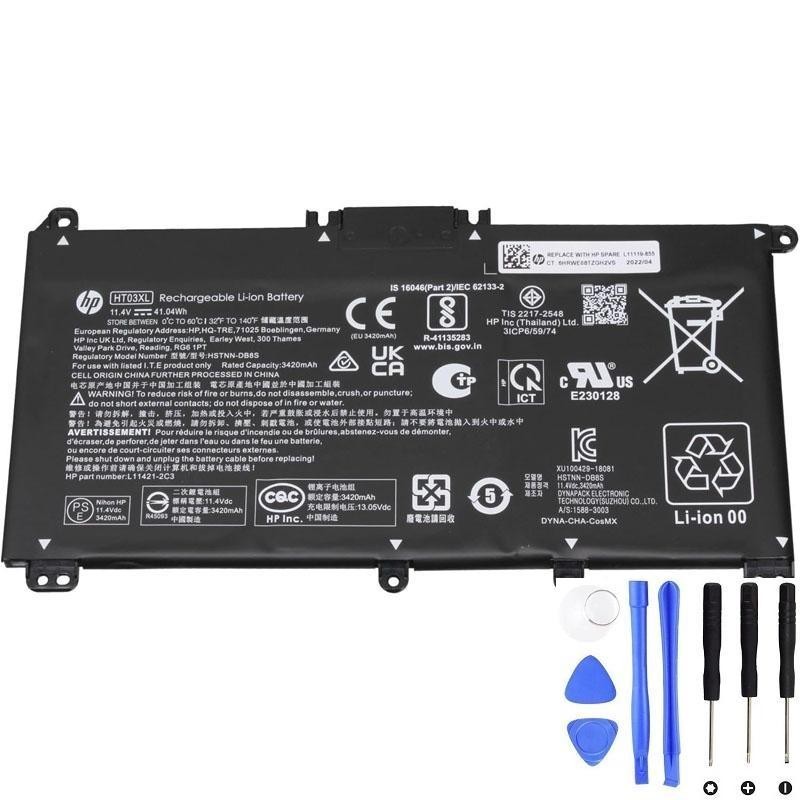
If your HP notebook uses the HT03XL pack (also labeled L11119-855 / HSTNN-DB8R), you can replace it at home with basic tools. Power down, remove the bottom cover, disconnect the old pack, screw in the new one, reconnect, reassemble, and finish with a simple calibration. Always recycle the old battery—don’t throw it in regular trash.
Before you start
Tools & supplies
- Small Phillips #0/#00 screwdriver (some HP models use Torx T5—check your screws)
- Plastic spudger / opening picks (avoid metal on plastic seams)
- ESD strap or touch a grounded metal surface often
- Tweezers (optional, for tiny connectors)
- Isopropyl alcohol (≥90%) + cotton swabs (clean light adhesive residue)
Safety checklist
- Shut down the laptop completely (don’t just sleep).
- Unplug the charger and accessories.
- Discharge the old battery to ≤25% if possible (safer if punctured).
- Press and hold the power button for 15 seconds after shutdown to drain residual charge.
- Work on a clean, non-conductive surface. Never bend, puncture, or crush a lithium pack.
Compatibility quick check (HT03XL example)
- Printed on the old battery or spec sheet you might see: HT03XL (model code), L11119-855 (part/spare), HSTNN-DB8R (family code).
- Voltage shown as 11.4–11.55 V (both are fine; it’s the same 3-cell nominal chemistry).
- Capacity varies slightly by vendor batch (e.g., 41.04 Wh vs 41.7 Wh)—that’s normal.
Not sure your model uses HT03XL? Check our compatibility tables and search by your laptop’s product number (e.g., 15-da0xxx, 14-cf2xxx).
Step-by-step: Replace the battery
- Remove the bottom cover
- Take out all visible screws. Some models hide screws under rubber feet or stickers—don’t force the panel.
- Starting at the hinge side, slide a plastic pick along the seam to release clips. Work slowly.
- Disconnect the old battery
- Locate the battery connector on the motherboard. It’s usually a horizontal multi-pin plug.
- Use a spudger to gently wiggle the plug straight out—don’t lift the socket off the board.
- Unscrew and lift out the pack
- Keep track of screw lengths (a phone snapshot helps).
- If there’s light adhesive, lift evenly; don’t flex the cells.
- Compare and prep the new pack
- Match connector orientation and mounting holes to your old pack.
- If your replacement ships in “shipping mode,” that’s fine—power-on will wake it.
- Install the new battery
- Place it flat, align holes, reinstall screws snug, not overtight.
- Reconnect the battery cable—confirm it seats fully.
- Reassemble and first boot
- Snap the bottom cover in, reinstall screws.
- Connect AC, boot into BIOS/UEFI → Battery Info (if available) to confirm detection, then boot into your OS.
Optimize & verify
- Calibrate (optional but recommended):
- Charge to 100% without interruption, then rest 30–60 minutes plugged in.
- Use the laptop on battery down to 5–7%, then recharge to 100%.
This helps the fuel gauge learn the new pack.
- Windows battery health report:
Open Command Prompt as admin →powercfg /batteryreport→ open the generated HTML to review design vs. full charge capacity and recent drain patterns. - Recycle the old battery:
Use an e-waste center or battery collection point; tape over the connector to prevent shorting.
Troubleshooting
- Battery not detected / “0% available”:
Reseat the connector → perform an EC/forced reset (unplug AC, hold power 15 seconds) → update BIOS/UEFI. - Laptop won’t power on after reassembly:
Check that the keyboard/trackpad ribbons are fully latched and the battery connector is seated. Try AC-only boot, then reconnect the battery. - Rapid drain after replacement:
New packs may need 1–3 full cycles to learn. Also check background indexing, Windows updates, or a stuck high-draw app in Task Manager. - Slightly different Wh rating on the label:
Normal. Manufacturing tolerances and different cell vendors lead to minor capacity differences (within a few percent).
FAQ
Is 11.4 V the same as 11.55 V?
Yes—both represent a 3-cell Li-ion battery’s nominal voltage range and are interchangeable within the same pack family.
Do I need thermal paste or adhesive?
No thermal paste for batteries. Some models use light foam/adhesive pads; reuse if intact or replace with equivalent low-tack pads.
Can I keep the old battery as a spare?
We don’t recommend storing swollen or degraded packs. If you must store, keep it around 40–60% charge in a cool, dry place and inspect periodically.
What about “smart” battery calibration tools?
For most modern HP laptops, the charge/discharge cycle above is enough. Avoid deep discharges to 0% regularly—that shortens lifespan.
Where to buy the HT03XL
Prefer a supplier that verifies compatibility against your exact model and offers clear warranty/returns. (On our store: HT03XL / L11119-855 replacement with 1-year warranty and pre-ship compatibility check.)