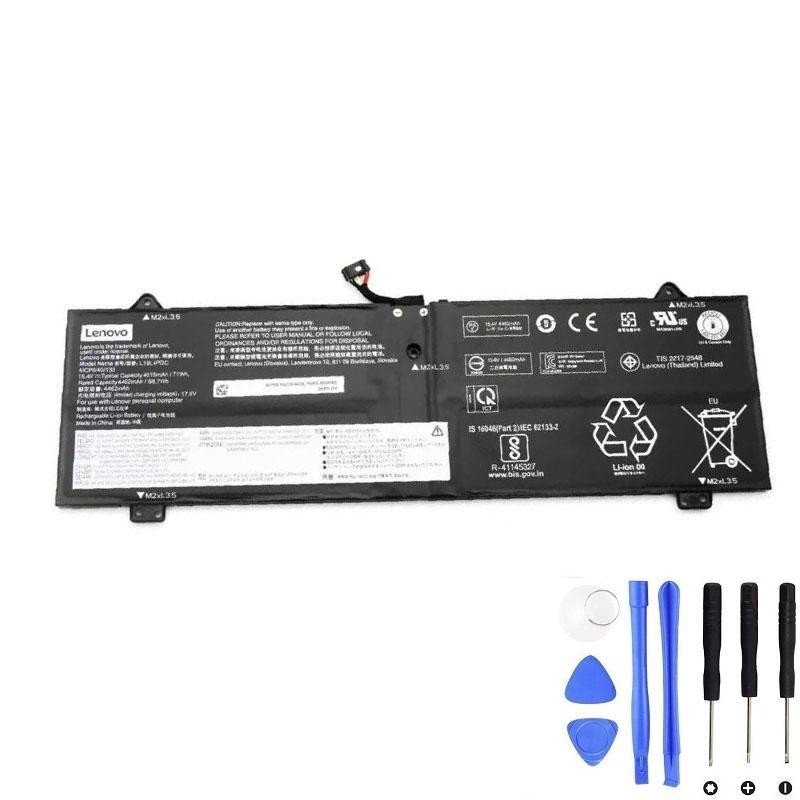
Applies to: Yoga 7-14ITL5 Laptop (IdeaPad) — Type 82BH & 82BJ. The process is very similar for other laptops that use the Lenovo L19L4PDC 71Wh battery.
Buy the Lenovo L19L4PDC 71Wh Battery
Battery Problem Diagnosis Checklist
Checked 2+ items? Replacement is likely. Jump to the Step-by-Step Replacement or order the L19L4PDC 71Wh battery.
Summary
- Compatible Models & Part Numbers
- Common signs your battery needs replacement
- Verify it’s the battery
- Preparation & safety
- Remove the lower case
- Remove the battery pack
- Install new battery & reassemble
- Post-replacement setup & calibration
- FAQ
- All steps together
Compatible Models & Part Numbers
The Lenovo L19L4PDC 71Wh battery is compatible with the following Lenovo part numbers and laptop models:
- Part Numbers:
- Lenovo 5B10Z26479
- Lenovo 5B10Z26482
- Lenovo 5B10Z26485
- Lenovo SB10Z26481
- Lenovo SB10Z26486
- Lenovo L19C4PDC
- Lenovo L19M4PDC
- Lenovo L19L4PDC
- Laptop Models:
- Lenovo IdeaPad Yoga 7-14ITL5 (82LW)
- Lenovo Yoga 7 14ITL5 (82BH)
- Lenovo Yoga 7-15ITL5 (82BJ)
- Lenovo Yoga 7-14ACN6 (82N7)
Common Signs Your Laptop Battery Needs Replacement
- Rapid drain or unexpected shutdowns even at mid-level percentages.
- Charge cap or bounce: stuck at 60–80% or percentage jumps.
- Swelling: lifted touchpad, case gaps, bottom cover no longer sits flat.
- Low health / high cycles: reported capacity < 70% of design.
- Runs only on AC or shuts off immediately when unplugged.
- System warnings in Lenovo Vantage or Windows “Battery needs service”.
Verify: Is It Really the Battery?
- Charger/port check: try a known-good 65W+ USB-C charger and cable; inspect the port for debris.
- Update firmware/drivers: Lenovo Vantage and BIOS updates can fix charging logic issues.
- Windows report: run
powercfg /batteryreport; compare Design Capacity vs Full Charge Capacity. - Lenovo diagnostics: run battery health tests in Lenovo Vantage.
If the battery is swollen or fails diagnostics, proceed with replacement: Lenovo L19L4PDC 71Wh.
Preparation & Safety
- Back up important files.
- Shut down the laptop completely; unplug AC and peripherals.
- Recommended tools: Phillips #0/#00 screwdriver, plastic spudger/opening pick, ESD strap.
- Work on a clean, flat, non-conductive surface; keep screws sorted.
Remove the Lower Case (Yoga 7-14ITL5 Demo)
Model shown: Yoga 7-14ITL5 (IdeaPad) Type 82BH & 82BJ. Other models that use the L19L4PDC follow a similar process.
Important: Make sure the computer has been shut down before servicing.
Step 1 — Orient the Laptop
- Place the computer upside down on a flat surface.
Step 2 — Remove Seven Screws
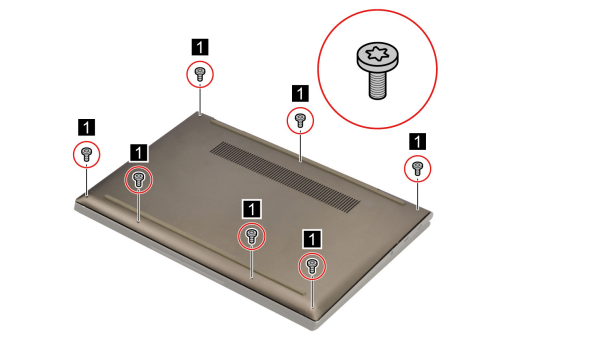
Figure: Remove seven screws.
| Screw specification | Quantity |
|---|---|
| M2 × L6 | 7 |
Step 3 — Release Latches & Lift Lower Case
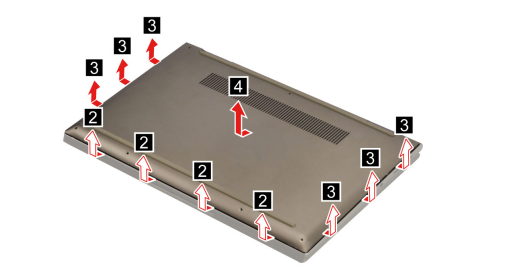
Figure: Pry up the latches and remove the lower case.
Remove the Battery Pack
Step 1 — Disconnect Battery Cable
Attention: Use your fingernails to pull the connector straight out. Do not pull the cable.
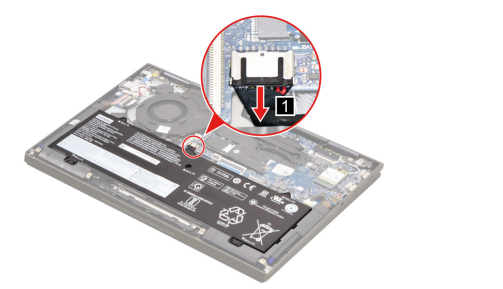
Figure: Disconnect the battery pack cable from the system board.
Step 2 — Remove Battery Screws & Lift Battery
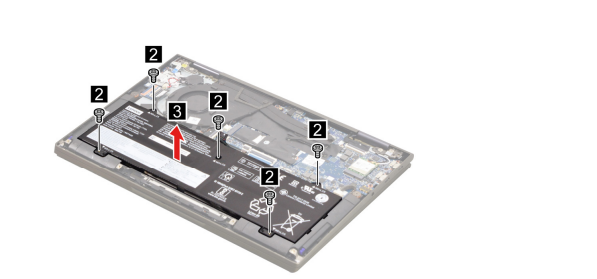
Figure: Remove five screws and then remove the battery pack.
| Screw specification | Quantity |
|---|---|
| M2 × L3.5 | 5 |
Install the New Battery & Reassemble
- Place the new L19L4PDC 71Wh battery into the bay; ensure it sits flush and the cable routes cleanly.
- Install the five M2 × L3.5 screws and snug them evenly (do not overtighten).
- Reconnect the battery cable, pressing the connector straight in until fully seated.
- Reattach the lower case: align clips, press around the perimeter to engage latches.
- Install the seven M2 × L6 screws in a cross pattern.
- Visually check for even gaps and secure fit.
Order the L19L4PDC 71Wh Battery
Post-Replacement Setup & Calibration
- Connect AC and power on; confirm the battery is detected in Windows/Lenovo Vantage.
- Calibrate: charge to 100%, keep charging 30–60 minutes, then use on battery to ~10–15% and recharge to 100% without interruption.
- Keep firmware up to date for optimal charging behavior.
- Best practices: avoid heat, store at 40–60% if unused for weeks, keep vents clear.
FAQ
Will these steps work on other Lenovo models with L19L4PDC?
Yes. The photos show Yoga 7-14ITL5 (Type 82BH/82BJ). Other laptops using L19L4PDC follow a similar sequence: remove lower case, disconnect battery, remove screws, swap, and reassemble. Screw counts/lengths may vary; confirm before reassembly.
What if the battery is swollen?
Stop using the laptop, power down, unplug, and replace the battery as soon as possible to prevent damage.
Do I need special tools?
Precision Phillips (#0/#00) and a plastic pry tool are sufficient. An ESD strap is recommended.
Step-by-Step (All Steps Together)
- Shut down; unplug AC and peripherals.
- Place the laptop upside down on a flat surface.
- Remove seven M2 × L6 screws from the lower case.
- Pry up latches and lift off the lower case.
- Disconnect the battery cable from the system board (pull the connector, not the cable).
- Remove five M2 × L3.5 screws from the battery and lift the battery out.
- Position the new L19L4PDC 71Wh battery, install the five screws, and reconnect the cable.
- Reinstall the lower case, engage latches, and fasten the seven screws.
- Boot on AC power, verify detection, then perform calibration.