Dell G15 5520 Battery Replacement (P105F007 / P105F008) — Diagnose, Decide, and Do It Right
Feel like your G15 5520 dies too fast, drops charge in sleep, or shuts off around 20–40%? This guide walks you through the full journey—from recognizing battery trouble to safely installing a fresh pack—optimized for both first-time upgraders and power users.
Model focus: Dell G15 5520, Regulatory Type P105F (subtypes P105F007 / P105F008).
Common Battery Problems That Justify a Replacement
| Symptom | What it usually means | Quick verification |
|---|---|---|
| Very short runtime (lost >40–50% vs new) | Capacity wear; cells can no longer store enough energy | Run powercfg /batteryreport; compare Full Charge Capacity vs Design |
| Sudden shutdown at 20–40% | Voltage sag under load; worn cells or faulty gauge | Battery Report + one calibration cycle; if persists, replace |
| “Plugged in, not charging” after ruling out adapter issues | Battery health limit reached or pack failing to accept charge | Test with OEM-rated adapter; check BIOS/SupportAssist battery health |
| Large overnight drain in sleep/modern standby | Background tasks + aging pack with higher self-discharge | Hibernate for long breaks; if still large, consider replacement |
| Battery status shows “Service” / fails diagnostics | Controller logged capacity/impedance fault | Run Dell diagnostics; Battery Report shows big capacity gap |
| Physical swelling (raised trackpad, case separation) | Gas buildup inside cells—safety risk | Stop using immediately; replace the battery |
| Age & cycles (heavy use over 2–3 years) | Normal end-of-life | Check cycle count (if reported) and real-world runtime |
Battery Problem Diagnosis Checklist
Tick what applies. If you tick two or more, we recommend a replacement.
Tools & Safety
- Phillips precision screwdriver (PH0/PH00)
- Plastic scribe/spudger (no metal prying on the chassis)
- ESD wrist strap or frequent grounding
- Clean, well-lit workspace
Step-by-Step Replacement (Dell G15 5520)
1) Remove the Base Cover
- Loosen the four captive screws that secure the base cover to the palm-rest and keyboard assembly.
- Remove the four screws (M2×6) that secure the base cover.
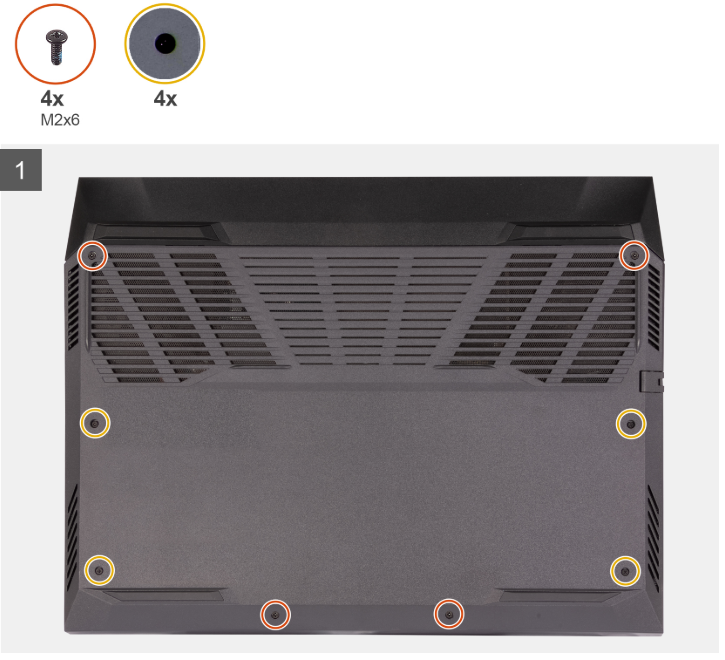
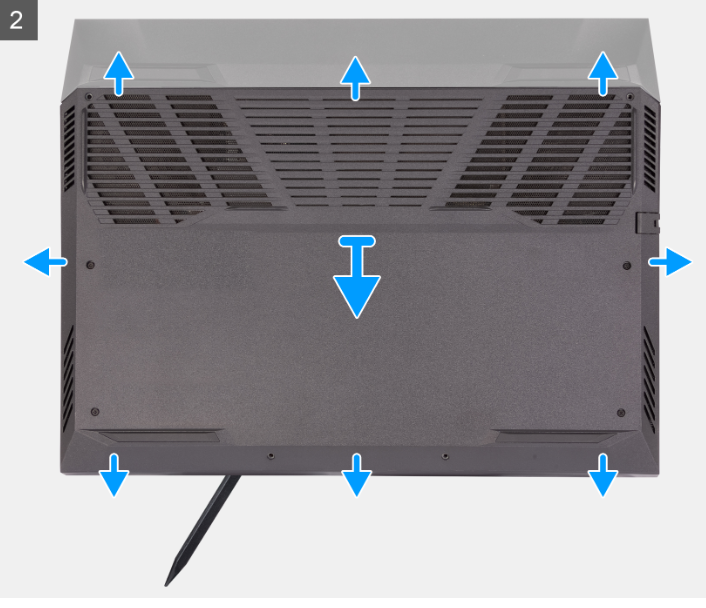
Loosening the two captive screws at the front creates a small gap. Starting from the left corner, use a plastic scribe to release the tabs and lift the cover.
2) Disconnect the Battery & Drain Flea Power
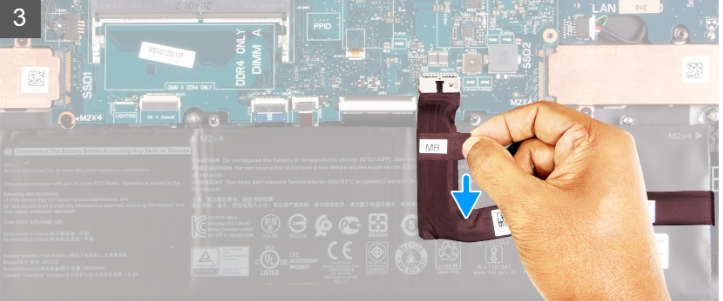
- Using the pull tab, disconnect the battery cable from the system board.
- Turn the laptop over and press the power button for 15 seconds to discharge residual power.
3) Remove the Battery
The image below shows the battery location and removal path.
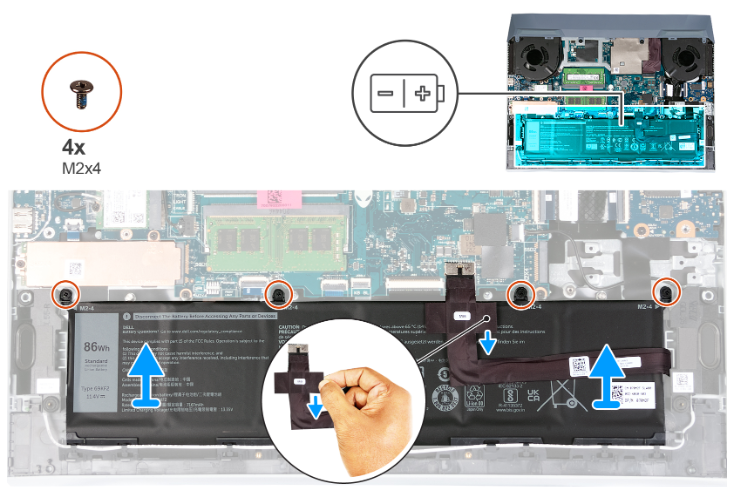
- Ensure the battery is disconnected from the board.
- Remove the four screws (M2×4) securing the battery.
- Lift the battery off the palm-rest and keyboard assembly.
4) Install the New Battery
- Place the new pack (verify your part number) into position and align mounting holes.
- Install the four M2×4 screws.
- Reconnect the battery cable firmly and route it as original (avoid pinching).
5) Reassemble the Base Cover
- Seat the base cover from back to front, confirming all clips engage.
- Install the four M2×6 screws and tighten the four captive screws.
Screws & Torque Notes
| Location | Qty | Type | Notes |
|---|---|---|---|
| Base cover | 4 | Captive | Front edge; loosen to create a pry gap |
| Base cover | 4 | M2×6 | Remove completely |
| Battery | 4 | M2×4 | Do not overtighten |
Hand-tight with a precision driver is sufficient; over-torque may strip threads.
Post-Install: First Boot, Calibration & Battery Report
- Connect AC and power on. Confirm Windows detects charging.
- Optional: update BIOS and Dell drivers/utilities.
- Calibration (to sync the gauge): charge to 100% and rest 30–60 minutes → use on battery down to ~10–15% (or auto-sleep) → recharge to 100% without interruption.
- Generate a Battery Report for your records: open Command Prompt (Admin) and run
powercfg /batteryreport, then open the HTML report to compare Design Capacity vs Full Charge Capacity.
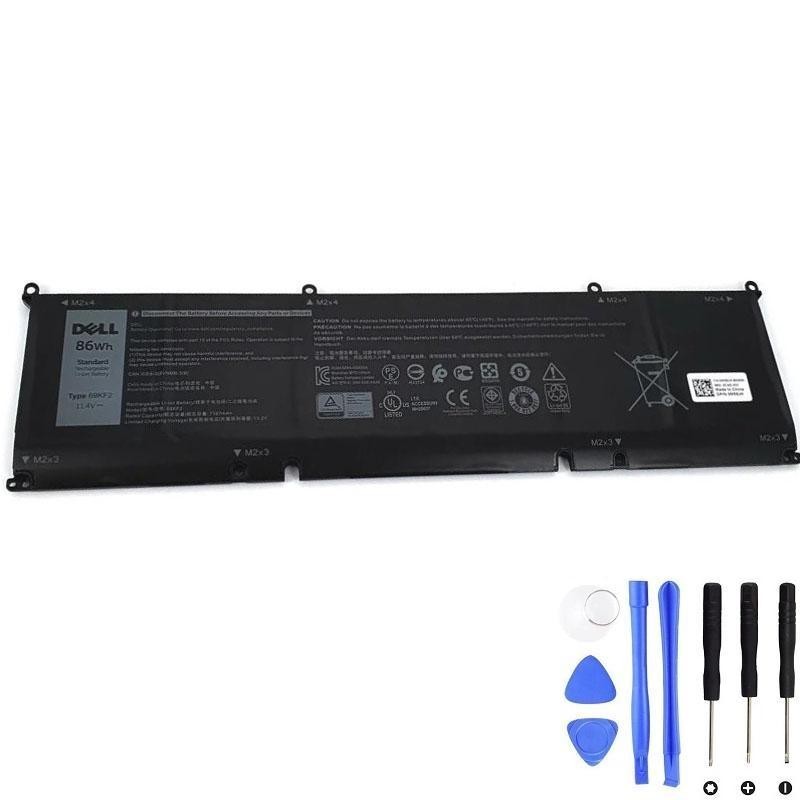
Recommended Replacement — 86Wh (69KF2) for Dell G15 5520
For many G15 5520 configurations, an 86Wh pack (69KF2) restores runtime and stability. Verify your original battery label before ordering.
View & Buy — Dell 69KF2 86Wh Battery
- High-capacity 86Wh for longer sessions
- Verify part number on your original pack
- Battery cable not included—reuse or order separately
FAQs
Will replacing the battery fix “on-AC drain” while gaming?
Is the battery cable included with the replacement?
Do I need to calibrate monthly?
How do I confirm my part number?