Common Battery Problems — How to Decide If Replacement Is Necessary
Below are the most frequent—and telling—signs that the ASUS FX706HEB battery is nearing end of life. If two or more apply, plan on replacing the battery soon.
| Symptom | What You’ll Notice | Why It Matters | Typical Next Step |
|---|---|---|---|
| Rapid drain | Battery drops from 100% to <50% in under an hour during light tasks. | Capacity loss (high wear level) reduces runtime drastically. | Run a Windows battery report and check design vs. full charge capacity. |
| Sudden shutdowns | System powers off as soon as the charger is unplugged or at 20–40%. | Cell voltage sag triggers protective shutdown. | Verify with a different charger; if unchanged, battery is suspect. |
| Won’t charge / stuck percentage | Charges to a fixed % (e.g., 60–80%) or shows “plugged in, not charging.” | Degraded cells or worn cycle count; sometimes BMS protection. | Confirm battery health; update BIOS; if persistent, replace battery. |
| Swelling (bulging) | Trackpad lifts, bottom cover gap, or keyboard feels tight. | Gas build-up from failing cells is a safety risk. | Stop using immediately, replace the battery, and dispose properly. |
| Inaccurate gauge | Battery % jumps (e.g., 80% → 20% → 60%). | Worn cells confuse the fuel gauge; calibration won’t fix severe wear. | If wear ≥ 30%, replacement is the realistic fix. |
| Overheating near battery area | Unusual warmth on the palm rest or underside during idle. | Increased internal resistance; can shorten component lifespan. | Rule out dust/vents; if heat persists, consider replacement. |
| Health warnings | MyASUS/Windows reports “Consider replacing your battery.” | Software flags poor health (low full-charge capacity). | Validate with a battery report; plan replacement. |
Battery Problem Diagnosis Checklist Interactive
Tick what applies to your laptop today:
Verify the Issue (Free Checks Before You Buy)
1) Generate a Windows Battery Report
On Windows, right-click Start → Windows Terminal (Admin) and run: powercfg /batteryreport /output %HOMEPATH%\Desktop\battery-report.html. Open the file on your Desktop and compare Design Capacity vs. Full Charge Capacity. If wear is high (e.g., full charge ≤ 60–70% of design), a new battery will restore runtime.
2) Eliminate Charger/Port Issues
- Test with a known-good ASUS charger of correct wattage.
- Inspect the DC jack and cable for looseness or damage.
- Update BIOS and chipset drivers via ASUS support (optional but helpful).
Parts & Tools
| Item | Details | Notes |
|---|---|---|
| Replacement Battery | ASUS C41N1906-1 (90Wh) — compatible with ASUS FX706HEB | See Buy link below. |
| Phillips Screwdriver | #0 / #00 | Magnetic tip recommended. |
| Non-conductive Pry Tool | Plastic spudger / opening pick | For cover and battery connector. |
| ESD Protection | Anti-static wrist strap (optional) | Work on a non-metallic surface, unplug AC. |
| Small Container | Screw organizer | Keep track of different screw lengths. |
Buy the Compatible Replacement Battery
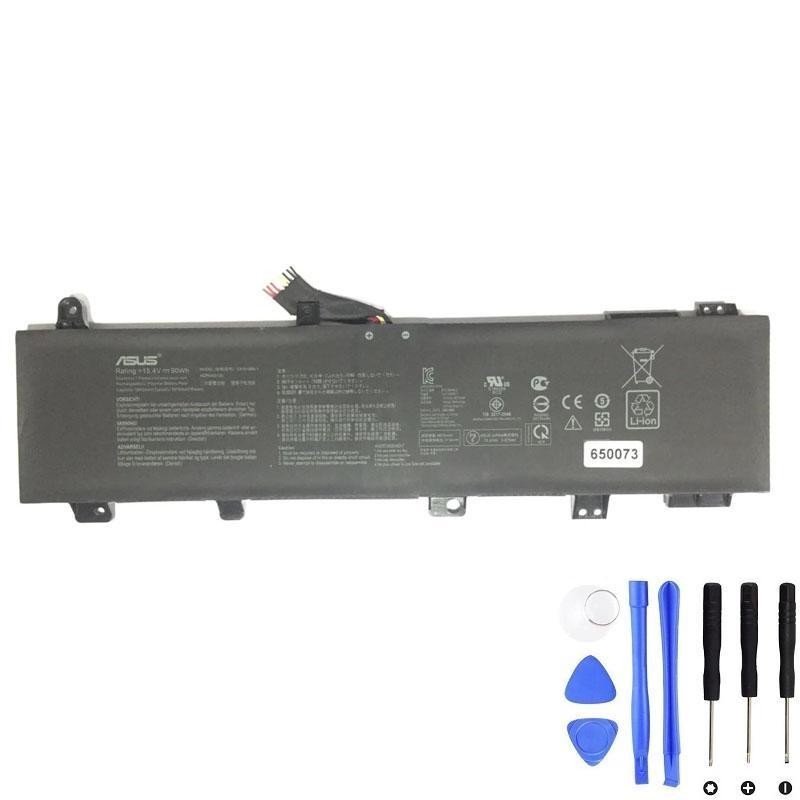
ASUS C41N1906-1 (90Wh) Battery
Direct fit for ASUS TUF Gaming FX706HEB. Restores runtime and stability. Buy from the product page below:
Step-by-Step Replacement Procedure
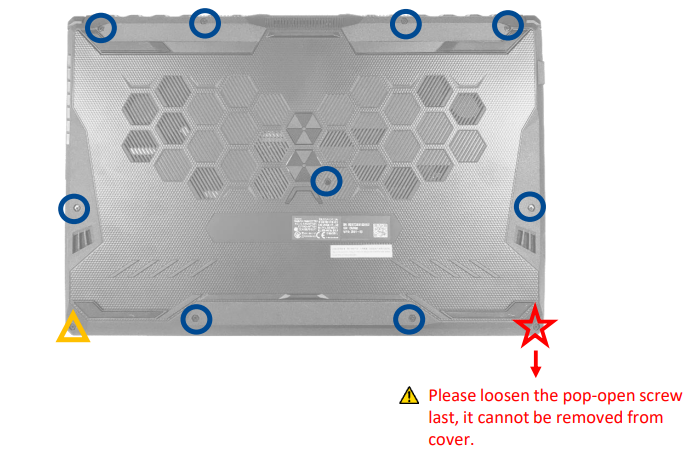
Step 1. Remove the Base Cover Screws
Loosen all screws on the FX706HEB bottom cover. Screws marked with a red star are captive and cannot be removed—leave them attached to the cover.
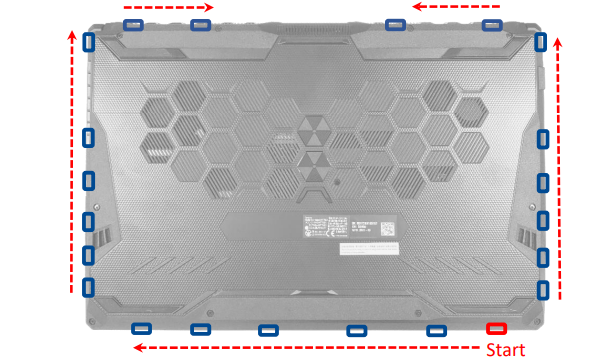
Step 2. Pry Up the Base Cover
Insert a non-conductive pry tool at the indicated seam and gently work around the edges to release clips. Avoid metal tools to protect the chassis.
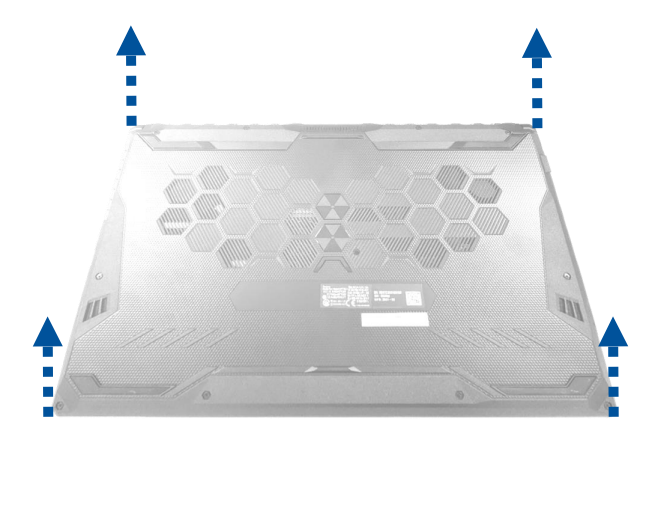
Step 3. Lift and Remove the Base Cover
When all clips are free, lift the cover and set it aside. Ensure no cables are snagged.
Step 4. Disconnect the Battery Connector (Part 1)
Locate the battery connector and gently pull the cable away from the socket to disconnect. Do not tug on individual wires.
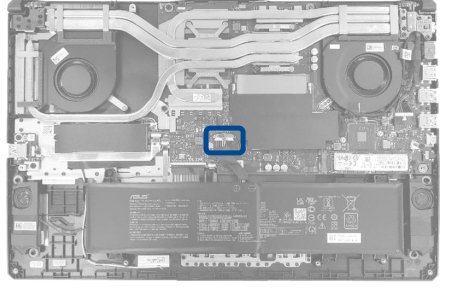
Step 5. Disconnect the Battery Connector (Part 2)
Use a non-conductive pry tool to carefully walk the connector out of its socket evenly from both sides.
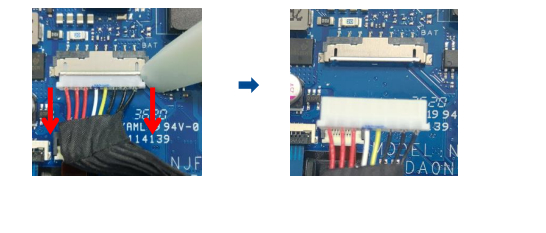
Step 6. Remove the Old Battery
Unscrew all battery mounting screws and lift the battery out. Keep screws organized for re-use.
Step 7. Install the New Battery
- Place the C41N1906-1 (90Wh) battery into position and align screw holes.
- Reinstall and snug the screws (do not overtighten).
- Reconnect the battery connector firmly and evenly.
Step 8. Refit the Base Cover
Seat the cover, press around the edges to engage clips, then tighten all screws. Captive screws will remain attached to the cover.
Step 9. First Power-On
Connect the charger and power on. If the system boots normally and detects the battery, you’re ready for calibration below.
After Installation: Calibration, Tests & Safety
Battery Calibration (Recommended)
- Charge to 100% and keep charging for an extra 30 minutes.
- Use the laptop on battery to ~10–15%.
- Recharge uninterrupted to 100%.
This helps the battery gauge report accurately. Run another battery report to confirm the new full charge capacity.
Quick Function Check
- Battery percentage increases when charging and decreases on battery.
- No unusual heat, bulging, or odors.
- Windows/MyASUS reports normal battery health.
Recycle the Old Battery
Do not dispose in household trash. Take the old battery to an authorized e-waste or battery recycling facility.
FAQ
Will replacing the battery void my warranty?
If the device is out of warranty, user-replaceable service is standard. If in warranty, check ASUS terms or use authorized service to remain covered.
Why does my laptop shut down at 30%?
Degraded cells can cause voltage to sag below safe thresholds, triggering sudden power-off. Replacement fixes this.
Do I need to update BIOS after replacing?
Not required, but being on a recent BIOS can improve charging behavior and battery gauge accuracy.
Buy Now.